Get Started
To test KubeAuth.io we recommend to use our fully functional demo. You can use the demo in your own test setup with your own applications or you use our simple html application.
For the testing we provide an IDP system based on AWS-Cognito. You can curl an access token with our demo user and use this token for authentication.
Prerequisites
KubeAuth.io assumes you have a running Kubernetes, it does not matter if it is a cluster or a Minikube. The following prerequisites are needed for your environment:
- Kubernetes, Version >= 1.16.0
- In Kubernetes the MutatingAdmissionWebhook as an admission controller
- For the installation admin rights are needed
- Helm
- The Demo is using curl with jq for running the requests. We recommend using an application like Postman.
Demo setup
The following picture shows the setup if the Demo.
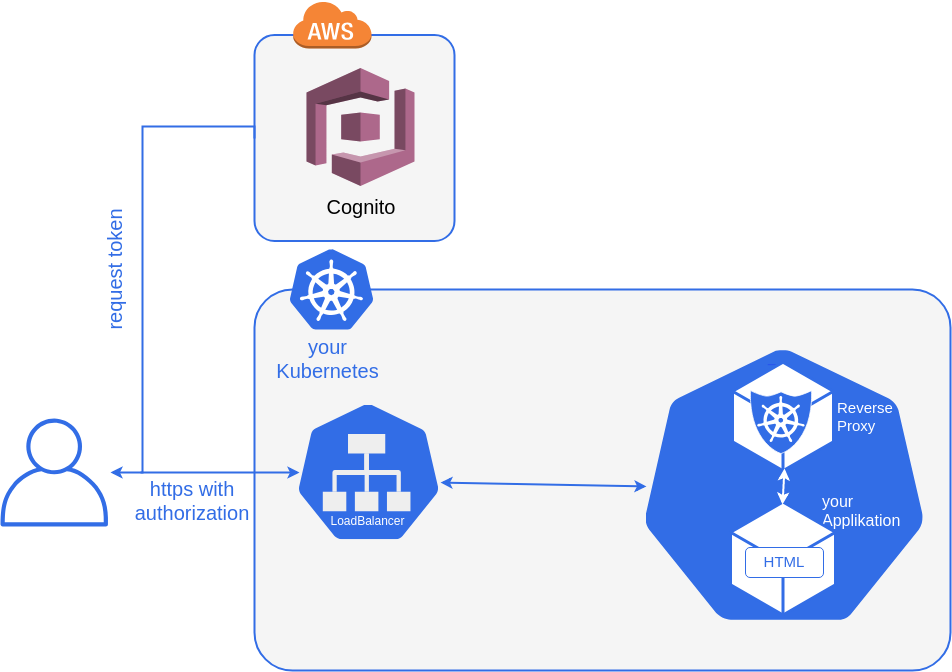
Please be aware that you can use the provided application but the Demo is working with every other web based application you provide.
Configuration
Install KubeAuth.io
Add our HELM repository to your dictionary.
helm repo add yotron-helm-charts http://helm.yotron.de
and install KubeAuth.io
helm install kubeauth yotron-helm-charts/kubernetes-authentication
Install a Pod
You can install our provided HELM based Demo App or you provide an own application or you do both. The Demo App has already a proper setup, for your application you must adapt your installation scripts, if it is a HELM script or an ordinary manifest.
Install the provided Demo Pod
Our application is included in our HELM repository (see above).
helm install kubeauth-testapp yotron-helm-charts/kubernetes-authentication-testapp
Set up your own application
You can use the Demo with your own application pod. To do so, the Kubernetes Pod must be setup properly with the right labels. For a detailed description of the labels please see Link
...
metadata:
  labels:
    kubeauthInit: "true"
    kubeauthUniqueName: "kubeauth-webapp" --> select a name of your choice
    kubeauthConfig: "AWSCognito" --> to use the identiyty provider for the Demo
    kubeauthLogLevel: "INFO" --> select a loglevel of your choice
    kubeauthService: "LoadBalancer" --> select a service of your choice
spec:
...
Validate the installation
The Demo App is installed separately from the pods of KubeAuth.io into the default. If you are using an own app you
are free to choose another namespace.
To validate the installation of KubeAuth.io please see Link.
When everything is properly installed, you get a pod in the default namespace with a similar name.
Validate the Demo Pod
$ kubectl get pod
NAME                      READY   STATUS    RESTARTS   AGE
webapp-669f54ffc9-26chz   2/2     Running   0          19h
The Demo Pods is running properly, when the Pod is in status Running with two containers (2/2). If you are using an own Pod, it could be that more
containers are running in that Pod.
You can list all container within the Pod with
kubectl get pods <name of the pod> -o jsonpath='{.spec.containers[*].name}'
The result for the Demo is:
$ kubectl get pods webapp-5bf8fb9994-8nj8q -o jsonpath='{.spec.containers[*].name}'
webapp kubeauth-sidecar
ẁebappis the name of the web app, kubeauth-sidecar is the name of the added Reverse Proxy of KubeAuth.io. If you are using an own pod
kubeauth-sidecar must be available too, to have a proper running KubeAuth.io.
Validate the Demo Service
The Demo App got an additional service automatically, even if you deployed an own Pod:
- type:
LoadBalancer - namespace:
default - name:
kubeauth-webapp - listening on
httpson port8443.
$ kubectl get svc
NAME              TYPE           CLUSTER-IP     EXTERNAL-IP     PORT(S)          AGE
kubeauth-webapp   LoadBalancer   11.100.0.182   192.167.1.241   8443:31547/TCP   13m
...
The ClusterIP (11.100.0.182), ExternalIP (192.167.1.241) and the NodePort (31547) are handled flexible. You can have different IPs or a
different NodePort.
Test a request
We provided a dummy user or that Demo on AWS-Cognito as the identity provider. This user has no right on anything. The only thing you can do with this user, is to request an access token for using it in this Demo.
URLs for requests
With the setup in the example you are able to reach the Demo App via
-
https://<Hostname of the Kubernetes node>:31547 -
https://192.167.1.241:8443
You can reach the service outside the cluster server(s) of Kubernetes. The first URL with the NodePort should be running out-of-the-box if you have a proper kube-proxy setup.
If you want to use the second ULR, you need a proper routing entry for the external IP and the:8443 port.
For demonstration purposes you can simply forward the port from your client with:
kubectl port-forward service/kubeauth-webapp 8443:8443
Then you can reach the Demo App with
https://127.0.0.1:8443
Get the access token from our idp
In reflect to AWS-Cognito and how AWS-Cognito is processing the authentication of a user itself, we chose to use a refresh token to request the access token. This is not the usual way, but it is enough for that Demo with AWS-Cognito. Other identity provider have other processes established to request access token.
The access tokens are always valid for 5 minutes (300 seconds), the minimum time for access token to become invalid by AWS-Cognito.
Setup some environment variables for the secured request for an access token.
REFRESH_TOKEN=eyJjdHkiOiJKV1QiLCJlbmMiOiJBMjU2R0NNIiwiYWxnIjoiUlNBLU9BRVAifQ.QlBYaTNMqjWy7hMGrTYWAZeQ5E_WMlmabl3ssSHXw5ezcV1XDqTHt_xVwS4HzAc88mDv2dcuAUzzXCN44Vu2YWv9G8nbba0VuvQ0EvoGtLkVqlsBu4oSdzceb4qNJ7K9gOxGbop7ELc2QvDphi_YgxjwH6Cj1Oj1RcSE7wWmJsjGFz3Cs3gkU5hJzYPTPRCYZriuj22v-f-TpCQv37_7G-5KkFJGo2XBTdpDZUBL03AWVyCw9G6y5CrnaDPdeRwzhSYUqxC3PViiM4OqtIP8-S2t78wSEMbdy1TpDNgfZ1HDIs2NWm5e0vmJrBbVV8aSckCTNgK64OyrFkQCbonn-w.SMoF-Phly4ehOsUW.c_7A3hN7Aq1mmiD8NqSQ-v0h4jXIlPWoVhrETdIDSlR9gyugd1oSFTeOLvOEJVT7NGRevapbv7pcztfEKMrG1I6fRwhTZJ9WQtvuuCgUo-wzQeFGaigqrBgEYhnHiS9-rsbvqJB9txGd7GFOG3i236aOk1jMr2KdSAYQiBdNtQvMO3Gc6TVAt1B6AWJ03KNpcN-0B0y3tGFPHLPEHG-JK6Cds-7fbQosrbrzXjNt0wrghMXOHoxqOvwuOP_vetS4h6TCw0ateCfWixbc-TSDRsMj0R_1J4ic0n6zYY-XyxHtt9_waFe-l_ULcK4IQNz5q77tJIqQJfBSt2W5Du1yTqsQH9saxTNLaT4GCocNCIh6uz1xux1VIEkjSagdHFykT3vWUCPjnkg3SarFFB0k1o_wQtahiFq1mB_LBKOh8Qm60PhpFHtu2j94BKfUvG3IIXCdsfhb0QqWkgxFGJFR-qWvHHzXTAAWK1gdV_IBAu8wJ60RhUnHvBRQfeGkE2bZVFQOk3zwBzE7x45k9T_pYzC2FnRwwononrOjdDSU8jNkwIPxz0OMLPIeL1-4Vhd4F8oYY_5xXDoVFL_heCMGZaCm1o9M41iI0cUGdftp4K0-LCVnVUFy-RsYl3jl5tYhbnEBmM9-Sdr4xmQJxk4AU09G-Ip6k8XcyDe8JBleOzm21TSDgAnVhbH9my6Y44SkLjKHmAvKH41zbmV-8dduBOB8KHAMObO7-dGM_HZeVR43Q0IWmhEfSSxCrvY6dnMPQ_gNcwcDAo-QygZSYfjUS1lJuHnwNo7hGwL1urA5K8GUWeIgrWhbSWLJI_Moxr9b8NJ468uXOjAejXUDeSaTsUV7kcMrmrAcXYCWb25qxi4_t6V-YHIA1NYD9XtVuJl6AatgXu4EALOojirQFro77KX2Y5YUJPNyiGf19i42jVnEOGNl0NlICLzJKQXql64UktM10544k_LC-tdbqmiNmKWrESVnsdhBnhvReGAYdSh74mgSBuwJ6sCW0uN_pQG_f7Fbf7LMVw4fnZ6afR1-10wIXzxesrBY7p3trgb03Mdw86YOXnpNJooXRK1d40sNVPGhETsF7clMRxAwiEHjSJwj5uPWPIIaQlawaqWKFqgw8cUkLTL5IW6gw04tVqu1Oym5_z4yTyIUHhNq7-zqOWAqD4mzqoG9tduxoEmAPNNJ8E8.fYchCg0YkiiPxZfmqhl90w
CLIENT_ID=4aplukkq507vp6aebn68qusi49
CLIENT_USER=4aplukkq507vp6aebn68qusi49
CLIENT_PW=1q3kpltsfpqgvjlppi5rh28id4hvs9h0r41ev0fvln4jtpota2ob
HEADER="Content-Type:application/x-www-form-urlencoded"
Now you are able to request the access token
curl -X POST -u $CLIENT_USER:$CLIENT_PW -H $HEADER -p https://auth.kubeauth.io/oauth2/token -d "grant_type=refresh_token&client_id=$CLIENT_ID&refresh_token=$REFRESH_TOKEN" | jq .
The result is looking like this (shortened):
{
  "id_token": "eyJraWQiOiJzRG4yalQwcFYxVjhw ... 6mbXjsrgHTSwTEWsgZzHdpXgG4aHudqeXA",
  "access_token": "eyJraWQiOiJcLzU5OWk0VDRVUEZiQ ... _wZA8v6EujH-LmnzQquQBX-vcSCmf6DrbkA",
  "expires_in": 300,
  "token_type": "Bearer"
}
The string behind “access_token” contains the valid authentication token to use for a request. This token can be copied.
Test the authentication
Now you can test the authentication with the token. Set the token string as an env variable (shortened).
ACCESS_TOKEN=eyJraWQiOiJcLzU5OWk0V ... v6EujH-LmnzQquQBX-vcSCmf6DrbkA
When you are using the Demo App you can call:
curl -k -H "Authorization: Bearer ${ACCESS_TOKEN}" https://<Your Kubernetes Host>:31547/gettext
When the token is valid you get the message successfully authenticated.
If the token is invalid you get a json back:
{
 "msg":"Token has expired"
}